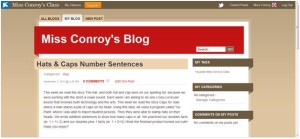
We are all familiar with the writing process. We brainstorm. We draft, revise and edit. Then, we publish. Publishing writing in school usually consists of hanging the writing in the hallway, perhaps with a cute craft attached. Students see the projects as they move up and down the hallways, but really, who gets the time to enjoy and appreciate student work in the hallway?
With all the concerns of school safety these days, the presence of parents is limited in school buildings. Parents enjoy coming into schools for Open House at the beginning of the year, and we all try to hang as much student work up as possible at that time. When Open House comes and goes, we don’t have a lot of traffic in and out of school buildings, so our students’ work doesn’t have much of an audience. At my school we have a Facebook page, where we frequently post photos of student work; however, parents don’t typically get a close up view of their student’s work. They have to wait for it to come home, before they really get to appreciate it.
Wouldn’t it be nice to provide students with more authentic learning tasks, shareable with not only the school community, but the outside community? With the introduction of Web 2.0 tools, like blogs, we as educators can now give students the opportunity to publish their work online so that family and friends can view it. Throughout my graduate school studies, I never felt that blogs were a viable option for my primary students, and that they were a tool best suited for secondary education. I felt this way, until I found kidblog.org.
I have only just begun using kidblog.org, but there are many features I love about it. First off, you can accomplish a lot for free, without having to subscribe to a premium account. You can sign up with google, so you don’t have to remember another user name and password. When you log in to kidblog.org and add your students, you can see all of your student blogs from your page. Additionally, your students will be able to easily view your blog posts and their classmates’ blog posts when they log in. I like their privacy settings too. When setting up your kidblog, you have options to make posts public or private, requiring users to log in to view them. You can also change privacy settings on a post by post basis.
My favorite feature about kidblog.org is how easy they have made the log in process for students. One of my biggest frustrations when using Web 2.0 tools with my students is that it is always so difficult for my young students to log in! With kidblog.org your students would go to your specific URL and select their user name from a drop down menu. Then all they have to do is type in their password. They have a well designed app, so you can access your kidblog from your iPad or iPhone. They also have a great mobile site. So far I have been impressed with the design and usability of kidblogs.org.
Now, you may be wondering how I am planning on using kidblogs.org with my 1st grade students when they are just learning how to read, write, and type. As you know, I plan on doing weekly cross-curricular projects with my students. Once completed, I plan on posting my projects to my class kidblog, so that students can share their work with their families. Many websites allow you to generate embed code for learning objects, so you can easily copy and paste embed code into blog posts. Blogs do not need to be reserved for just text, but thanks to embed code you can post multi-media projects, too!
What is your experience using blogs with your students? How do you protect student privacy while honoring their need to publish their work?
Coming Soon: Creating Digital All About Me Stories with Little Bird Tales


Pingback: Hats & Caps Number Sentences « EduCaitional Technology
Pingback: Using iMovie to Turn you Students into Music Video Stars! « EduCaitional Technology
Pingback: Creating an Interactive Virtual Photo Cube « EduCaitional Technology
Pingback: Mind Mapping with Popplet « EduCaitional Technology
I agree with pretty much all of your points here, although I’d like a bit of elaboration as to how to post multi media projects.
That is a great question, and I would love to go into more detail on that for you!
Any learning object your students may create that where you can generate embed code can be inserted in a blog.
Some examples I have embedded are
Smilebox Presentations from my Hats and Caps Number Sentence Lesson
The Virtual Photo Cube from my Todd’s Box Lesson
The Popplet from the All that Corn Lesson
and a Glog on the Life Cycle of a Chicken made with Glogster EDU (post coming soon!)
Whatever program you are using you want to select the embed code and copy it (ctrl-c).
Next, you would log into Kidblog, and you would click on “New Post”.
On the top of your post you have two tabs: “Visual” and “HTML”.
Click on the “HTML” tab.
Then you would paste. (ctrl-v)
Hit Publish and you are done!
Hope that helps! Please let me know if you have any other questions! Thanks for reading and commenting!
Pingback: Creating a Glog on the Life Cycle of a Chicken with Glogster EDU « EduCaitional Technology
Pingback: Strengthening the Home-School Connection with Classroom Website « EduCaitional Technology